# Villanova Process Driven Applications Plugin
# Introduction
The Villanova Process Driven Applications (PDA) plugin provides a rich and full-featured user experience for the management and implementation of business process automation. This solution template includes:
- A general purpose UX layer created from micro frontends that can be implemented for any business process or task engine. It serves data through the included Villanova integration adapter or via a set of interfaces on the server side.
- A Spring Boot microservice backend providing a pluggable interface for the injection of underlying processes or automation toolkits. The interfaces and steps for creating a new PDA backend implementation are described in further detail here.
The following tutorial installs the PDA plugin via the Local Hub and an Villanova Bundle. It demonstrates the process automation enabled by integrating:
- Custom Micro Frontends (MFEs)
- Backend for Frontend (BFF) microservice
- Red Hat Process Automation Manager (opens new window) (PAM)
Key elements of the template are reviewed in the Application Details section below.
# Installation
There are many assets installed as part of the Villanova PDA bundle. Villanova Bundles can include more or less components, depending on objectives. It is recommended that organizations develop guidelines for bundle sizing that fit their goals.
# Prerequisites
- An Villanova Application on any Kubernetes provider. Follow one of the tutorials appropriate to your environment to install the Villanova Platform.
- The ent command line tool, installed and connected to your Kubernetes instance.
- Red Hat PAM
# Automatic Install via the Villanova Hub
Log in to your
App Builder. Go toHub→Select Registry→ chooseVillanova Hubif it has been configured.- If not, choose
New Registry - In the pop-up window, enter
Villanova Hubandhttps://auth.entando.com/entando-hub-api/appbuilder/apifor the URL, thenSave - Select Villanova Hub in the Registry
- If not, choose
Click the PDA bundle icon and
DeployandInstallit in the pop-up window. The installation may take several minutes while the application downloads the Linux image for the microservice and installs the related assets.To finish the tutorial, skip to the Configuration Steps below.
# Manual Install
- Apply the Custom Resource Definition for the PDA Bundle.
ent ecr deploy --repo="https://github.com/entando-samples/entando-process-driven-plugin-bundle.git"
Log in to your App Builder instance.
Select
Hubfrom the left sidebar. Your bundles will be visible in the repository as shown here.

- Click the PDA bundle icon and
Installit in the pop-up window. The installation may take several minutes while the application downloads the Linux image for the microservice and installs the related assets.
# Configuration
WARNING
Configuration error on OpenShift 4.8+
An incomplete role definition prevents Villanova from configuring the PDA Plugin connections on RedHat OpenShift 4.8+. As a workaround, update the Villanova-plugin Role by adding the missing rules below.
apiVersion: rbac.authorization.k8s.io/v1
kind: Role
metadata:
  name: entando-plugin
rules:
  - apiGroups:
      - entando.org
    resources:
      - entandoplugins
    verbs:
      - get
      - update
  - apiGroups:
      - ""
    resources:
      - secrets
    verbs:
      - create
      - get
      - delete
      - update
Follow the steps below to configure service permissions and connections.
Set up permissions to configure the services for the PDA plugin:
- Log in to your Keycloak instance as an admin.
- Give at least one user the ability to configure and manage the PDA plugin by assigning all roles for the
pn-efbd66b6-b0ceabd7-entando-pda-plugin-serverclient. See Role Assignment in ID Management for more details.
Log in to the App Builder and configure the PDA connection:
Go to
Pages→Management, findPDA Connectionsin the page tree, and selectView Published PagefromActions.Click
Create new connectionin the upper right corner. TheName*,Engine*andTimeout*fields are prepopulated with default values. The default namepam-demomay be edited, but the datasource names of other widgets must match your settings.- PDA Dashboard
- PDA Process Definition
- PDA Smart Inbox
- PDA Task Details
To change the datasource, go to
Pages→Managementand selectDesignfrom the Actions menu for a page. Each component in the frames has a kebab drop-down menu to make changes. For the relevant widget, you can update theKnowledge Sourcefield by selecting theSettingsoption.- Leave
pamas the engine name. This value is appropriate for jBPM or PAM. - Leave the timeout as
60000msec. - Provide your connection URL to the KIE Server rest services, e.g. 'http://my.server.net:8080/kie-server/services/rest/server'.
- Username/password should be for a jBPM or PAM service account user, e.g. 'krisv'.
- Go to the Smart Inbox to begin working with the PDA plugin:
- Go to
Pages → Management, findPDA Smart Inboxin the page tree and clickView Published Pagefrom itsActions.
# Application Details
The Villanova PDA plugin demonstrates several important features of the Villanova Platform summarized below. For a discussion of these components in deployment, see PDA Deployment Architecture.
# Micro Frontends (MFEs)
This section provides a brief description of every MFE in the PDA plugin. Details specific to the PAM implementation of an MFE are included where applicable. MFE behavior and datasources must be defined if the integration layer is extended to other engines or customizations.
# A. Task List
The Task List MFE provides the user a list of visible tasks that are either assigned to or could be claimed by them. In the default implementation, the visible tasks are limited to a single process instance. At configuration time, the application designer is given the option to select a set of columns that are visible in the task list for that page.
![Task List in Table Format with create date, status, owner, etc.]](./pda-images/task-list.png)
The default PAM implementation exposes the top level task fields in the list for selection. It is possible to fetch task and process variables from the list for rendering, but this is disabled by default to optimize performance.
# B. Task Details
The Task Details MFE renders detailed information about a task in a read only grid. It gives the end user the information necessary to process the task. See the Styling section below to customize the layout.
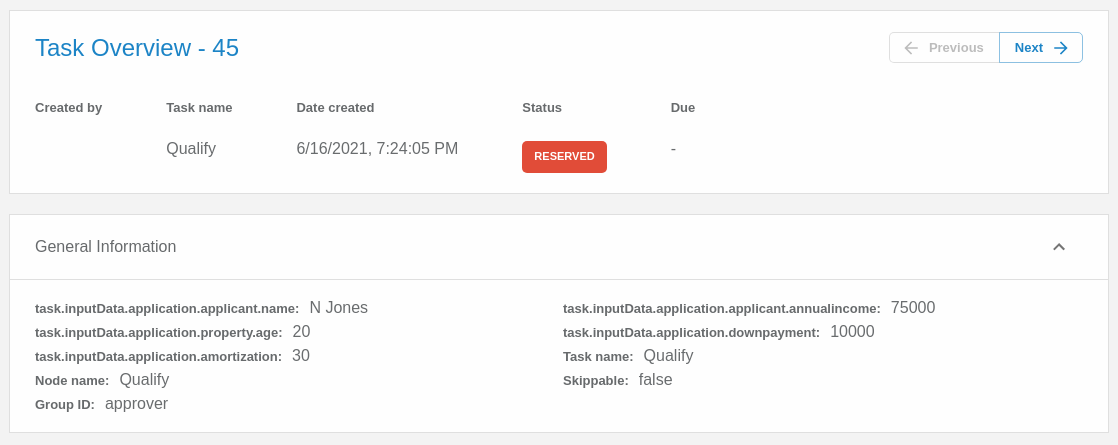
The PAM implementation renders task variables in the details widget.
# C. Task Comments
The Task Comments MFE enables the user to view and add notes attached to a task.
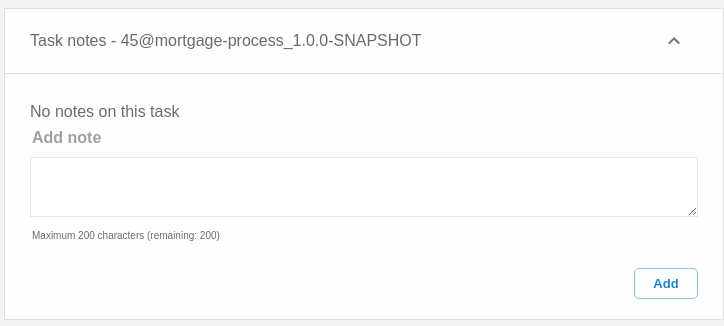
The PAM implementation reads and publishes notes to the comments endpoint.
# D. Task Form
The Task Form can be accessed by clicking on the Task Overview link found in the Task Details MFE. It is a form specific to a task completed by the user to define the way it is displayed.
A wrapper for the JSON Schema blueprint, it describes the layout, style and content of the form. The backend implementation provides the mapping to the schema and default UX layout needed to render the form. See the technical documentation for more on the JSON Schema implementation.
The PAM implementation of forms relies on the presence of a form definition for the PAM task. The Villanova PAM engine implementation transforms the format to JSON Schema to render the form. It also transforms the API format back to the PAM format. There are some limitations on form customization due to the format required to return the data to PAM. See the Task Forms section in the technical documentation for more information.
# E. Attachments
The Attachments MFE enables the user to view and add documents attached to a task, case or process. To add this capability to a page, go to Pages → Management in the App Builder, select Design from the desired page's Actions drop-down, and drag the "PDA - Task Attachments" widget into an empty frame.

The PAM implementation posts the documents to the PAM endpoints for storage.
# F. New Process Form
The New Process Form MFE renders a form enabling the end user to instantiate a new business process instance. The same technology is used to generate a New Process Form and the JSON Schema definition for a Task Form.
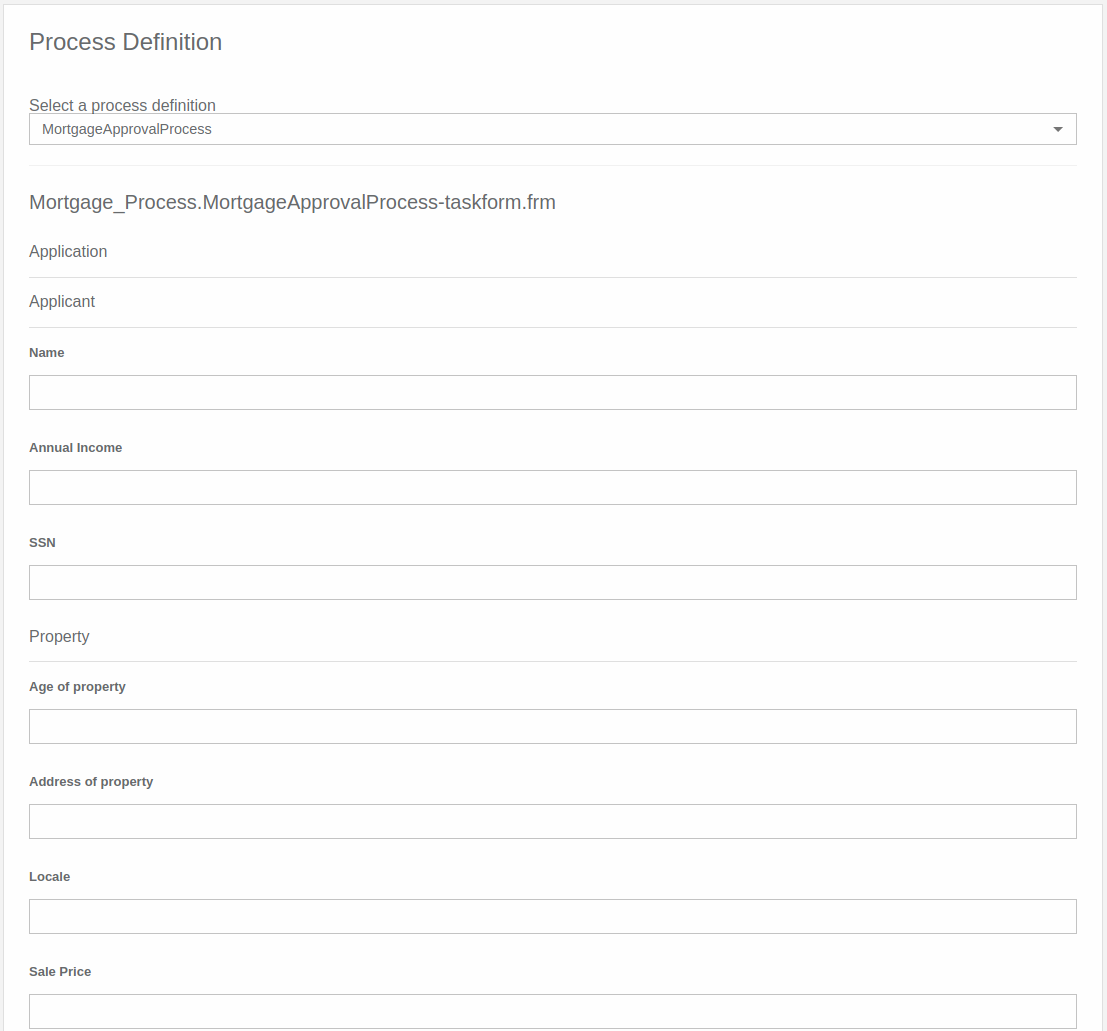
The PAM implementation relies on a form definition attached to the process definition. Villanova transforms the PAM representation into a JSON Schema form that can be rendered to the end user.
# G. Summary Cards
The Summary Cards MFE provides a view into the aggregate data for the process implementation. The rendered information includes a total value, a trend value, and a time frame selector. The MFE provides the option to request rendering information. This request maps to a call in the underlying engine and provides the summarized data.

The PAM implementation of the widget relies on the PAM custom query functionality. The PAM PDA engine exposes a configuration file where the custom query can be defined. This allows the user to customize the data rendered on the summary cards. The application contains a "properties" file where the user can submit a custom query for each of the cards.
# H. Totals Over Time
The Totals Over Time MFE provides a dual axis line/bar graph displaying trend information about the process environment. Three summary values can be compared over a single time period.

The PAM implementation of this MFE utilizes custom queries to fetch the summary data rendered for the chart. The queries used in the implementation are defined in configuration files in the MFE and can be updated to render specific data.
# Process Automation Manager (PAM)
The Villanova PDA is built on Red Hat Process Automation Manager, a business process automation engine with the following special features.
# Backend for Frontend (BFF)
A microservice architecture allows teams to rapidly iterate and develop technology to scale. Backend for Frontend is an architecture pattern built with microservices. The BFF is the key of this pattern, connecting the frontend of an application with the backend.
# Customization and Extension
This section describes how the PDA plugin can be customized and extended via:
- Styling
- Implementing a new engine
- Integrating a new task source
For an in-depth discussion of the PDA architecture, refer to the PDA Technical Guide.
# Styling
The MFEs of the Villanova PDA are styled with a Material UI theme. That theme can be downloaded and updated here (opens new window).
# Implementing a New Engine or Integrating a New Task Source
Emloying a new engine for Process Driven Applications means
creating a new Java project and implementing the interfaces defined in the
pda-core-engine project. The new project should therefore include the
pda-core-engine as a dependency.
To see an example in action, consider the pda-redhatpam-engine project, which applies the Red Hat PAM engine as an integrated dependency. The resultant JAR file should be available in the classpath for the entando-process-driven-plugin, which is the project that is ultimately executed, exposing the REST APIs for the frontend components.
One way to achieve this is by publishing the engine implementation to a Maven repository and adding it as a dependency to the entando-process-driven-plugin project. Below are the descriptions of
the engine class and key interfaces in the pda-core-engine project that must be inherited or applied when a new engine is created.
# Classes
Engine: represents a Business Process Management (BPM) engine and exposes the services that are available for that specific implementation. It is intended to be inherited, and the subclass should be provided for each service by calling the superclass constructor with its implementation as an argument. If any service is not supported, a null value should be passed to the corresponding constructor argument. The engine can also establish functionality for service interfaces.
# Interfaces
TaskService: defines service methods for task retrieval from the BPM engine.
TaskDefinitionService: defines service methods related to task definition. A task definition specifies which fields or columns are available for all task instances.
TaskCommentService: defines service methods related to task comment manipulation. It should be implemented if the task comment is supported by the engine.
TaskAttachmentService: defines service methods to operate on task attachments. It should be used if the engine supports file attachments on the task.
TaskFormService: defines service methods for task form operations, like retrieving the form definitions and submitting a form. The Form object can be used to render a form dynamically.
TaskLifecycleService: defines service methods related to the task lifecycle. The lifecycle operations move the task from one state to another.
TaskLifecycleBulkService: defines methods for bulk lifecycle operations. Like the TaskLifecycleService, these methods move the task from one state to another, but this interface works with multiple tasks at a time.
ProcessService: defines service methods for process definitions operations.
ProcessFormService: defines service methods for process form operations, like retrieving the form definitions and submitting a form. The Form object can be used to render a form dynamically.
GroupService: defines service methods related to groups in the BPM engine.
# Troubleshooting
- Reinstallation after an uninstall that will not progress
If the PDA plugin is uninstalled and then reinstalled, an issue may stop the process due to the secret containing the connection configuration names does not get updated upon reinstallation. To prevent this issue, an upgrade of the plugin is recommended instead of uninstalling, following best practices.
If removing the plugin bundle is required, create a backup of the VillanovaPlugin custom resource, metadata.name: pn-efbd66b6-b0ceabd7-entando-pda-plugin before removing it, and copy the list of connectionConfigNames to the new installation's plugin custom resource.
# Resources
# Source Code
The source code for the Villanova PDA plugin can be found on GitHub, along with our other open source examples and tutorials. Reference the component projects for instructions on how to build from source code:
- https://github.com/entando/entando-process-driven-plugin (opens new window)
- https://github.com/entando/entando-process-driven-plugin/tree/master/widgets (opens new window)
- https://github.com/entando/pda-redhatpam-engine (opens new window)
- https://github.com/entando/pda-core-engine (opens new window)